
Introduction
ServerTrack is a server-side tracking platform that sends conversion events directly from your website to marketing platforms - Facebook (Meta CAPI), TikTok Events API, and Google Analytics 4 - bypassing ad-blockers, browser restrictions, and iOS privacy limitations.
What is server-side tracking? Unlike traditional browser-based pixels that can be blocked, server-side tracking sends data from your server infrastructure directly to advertising platforms. This results in better data accuracy, improved attribution, and higher match rates. Learn more on Wikipedia →
With ServerTrack, you don't need to manage complex GTM containers or server infrastructure. Simply install our tracking code, connect your platforms, and your conversion data flows reliably.
What You'll Need
- A ServerTrack account (free tier available)
- A website running on WordPress, Shopify, or any custom platform
- Access to your domain's DNS settings (for custom domain setup)
- Your platform credentials - Facebook Pixel ID & Access Token, TikTok Pixel ID & Access Token, or GA4 Measurement ID & API Secret
Choose Your Integration Path
How It Works
Traditional tracking relies on JavaScript pixels running inside the visitor's browser. These pixels are increasingly blocked by:
- Ad-blockers - Extensions like uBlock Origin block Facebook Pixel, TikTok Pixel, etc.
- Browser privacy features - Safari ITP, Firefox ETP limit cookie lifetimes and third-party requests
- iOS App Tracking Transparency - Apple's ATT framework restricts cross-app tracking
ServerTrack solves this by acting as a first-party data relay:
- You set up a custom subdomain on your own domain (e.g.,
data.yoursite.com) - Our lightweight JavaScript SDK sends events to your subdomain - this looks like a first-party request to browsers
- ServerTrack receives the event data and forwards it directly to Facebook CAPI, TikTok Events API, and GA4 via server-to-server connections
- Marketing platforms receive high-quality, unhashed data with better match rates
Result: You recover 20-40% of conversion data that would otherwise be lost to ad-blockers and browser restrictions. Your ROAS reporting becomes accurate, and platform algorithms optimize better with complete data.
Domain Setup
For server-side tracking to work as a first-party connection, you need to point a subdomain of your website to ServerTrack's infrastructure. This is done by creating a CNAME record in your DNS settings.
What is a CNAME record? A CNAME (Canonical Name) record maps one domain name to another. When you create a CNAME for data.yoursite.com pointing to ServerTrack, all tracking requests go through your own domain - making them invisible to ad-blockers.
Step 1: Find Your CNAME Value
Log in to your ServerTrack dashboard, navigate to your server's Configuration → Custom Domain & SSL page. You'll find your unique CNAME value there (e.g., abc123.servertrack.io).
Step 2: Add the CNAME Record
Go to your domain registrar or DNS provider and add the following record:
| Type | Name | Value | TTL |
|---|---|---|---|
| CNAME | data | your-unique-value.servertrack.io | Auto / 3600 |
Note: The "Name" field uses just the subdomain prefix (e.g., data), not the full domain. This will create data.yoursite.com. The actual CNAME value will be shown in your ServerTrack dashboard.
Adding CNAME in Cloudflare
If you use Cloudflare for DNS management, follow these steps:
- Log in to your Cloudflare Dashboard
- Select your domain → Go to DNS → Records
- Click "Add record"
- Set Type to CNAME
- Set Name to
data(or your preferred subdomain) - Set Target to your ServerTrack CNAME value from the dashboard
- Important: Set Proxy status to "DNS only" (gray cloud icon, not orange). ServerTrack handles SSL itself - Cloudflare proxying will interfere.
- Click Save
Cloudflare Proxy Warning: Make sure the proxy toggle is OFF (gray cloud). If orange cloud is enabled, SSL certificate generation will fail and tracking won't work. Learn about Cloudflare proxy modes →
Adding CNAME in Other Providers
The process is similar across all DNS providers. Here are direct links to guides for popular ones:
- GoDaddy - Add a CNAME Record
- AWS Route 53 - Creating Records
- Namecheap - Create a CNAME Record
- Google Domains - Add CNAME
Propagation: DNS changes can take 5 minutes to 48 hours to propagate globally, though most complete within 15 minutes. You can check propagation status at whatsmydns.net.
Platform Configuration
After setting up your domain, connect your advertising platforms in the ServerTrack dashboard. Navigate to your server's Server-Side Connection Settings to input your credentials.
Facebook (Meta) CAPI
You'll need your Pixel ID and Conversion API Access Token from Facebook Events Manager.
- Go to Facebook Events Manager
- Select your Pixel → Go to Settings
- Copy your Pixel ID
- Under "Conversions API", generate an Access Token
- Paste both into your ServerTrack dashboard
TikTok Events API
You'll need your Pixel ID and Access Token from TikTok Ads Manager.
- Go to TikTok Ads Manager → Assets → Events
- Select your pixel → Settings
- Copy the Pixel ID
- Generate an Access Token under API Access
- Paste both into your ServerTrack dashboard
Google Analytics 4
You'll need your Measurement ID and API Secret.
- Go to Google Analytics → Admin → Data Streams
- Select your web stream → Copy the Measurement ID (starts with G-)
- Scroll down to Measurement Protocol API secrets → Create a new secret
- Paste both into your ServerTrack dashboard
Security: Treat your Access Tokens like passwords. Never share them publicly or commit them to version control. ServerTrack encrypts all tokens at rest.
 WordPress Integration
For WordPress users, we offer an official plugin listed on the WordPress.org plugin directory. It handles everything automatically - WooCommerce events, Easy Digital Downloads, and user data collection for enhanced matching.
Why a plugin for WordPress? Unlike Shopify (which has strict API limitations), WordPress gives plugins full access to all e-commerce hooks and events. Our plugin hooks directly into WooCommerce and EDD lifecycle events, giving you 100% event coverage without writing a single line of code.
Officially on WordPress.org
Verified, reviewed, and hosted on the official WordPress Plugin Directory. Install directly from your WordPress admin panel.
View on WordPress.orgPlugin Installation
There are two ways to install the ServerTrack WordPress plugin:
Method 1: From WordPress Admin (Recommended)
- Log in to your WordPress Admin Dashboard
- Navigate to Plugins → Add New Plugin
- In the search bar, type
ServerTrack - Find the official plugin (by ServerTrack.io) and click Install Now
- Click Activate once installation completes
- Go to Settings → ServerTrack in the left sidebar
- Enter your Authentication Key (found in your ServerTrack dashboard under Setup Kit)
- Enter your Custom Domain (e.g.,
data.yoursite.com) - Click Save Settings
Method 2: Manual Upload
- Download the plugin from WordPress.org
- Go to Plugins → Add New → Upload Plugin
- Upload the .zip file and click Install Now
- Activate and configure as described above
Verification: After saving settings, visit any product page on your site and check the Live Debugger in your ServerTrack dashboard. You should see a ViewContent event appear within seconds.
Auto-Tracked Events
Once activated, the plugin automatically tracks these events without any additional code:
Plugin Features
- Automatic user data collection - Captures logged-in user email, name, and phone for enhanced matching
- WooCommerce deep integration - Tracks full purchase funnel with product IDs, quantities, and values
- Easy Digital Downloads support - Tracks ViewContent and Purchase for digital products
- GDPR compliant - Respects user consent preferences and privacy settings
- Custom events via PHP - Use helper functions to fire custom events in your theme or plugins
WordPress Video Guide
Watch the step-by-step walkthrough of installing and configuring the WordPress plugin:
Video tutorial coming soon
We're recording a detailed WordPress setup walkthrough
 Shopify Integration
For Shopify stores, ServerTrack uses a Custom Pixel approach - a small JavaScript snippet installed via Shopify's Customer Events system. This gives you the most reliable server-side tracking possible on Shopify.
Why Custom Pixel Instead of a Shopify App?
You might wonder why we don't offer a Shopify App. Here's the honest answer:
- API Rate Limits - Shopify Apps are subject to strict API call limits. During sales events or high traffic, events can be dropped or delayed.
- Checkout Restrictions - Apps have limited access to checkout and post-purchase events (especially on non-Plus plans).
- Data Accuracy - App-based pixels rely on Shopify's webhook system which can have delays and missing data.
- Our Approach - Custom Pixels run in Shopify's sandboxed environment with full access to all customer events. Zero compromise on ROAS accuracy. No missed conversions.
Good to know: Shopify's Custom Pixels are an official feature designed exactly for this purpose. They run in a secure sandbox with access to all standard e-commerce events. This is not a hack or workaround - it's the recommended approach by Shopify for server-side tracking.
Standard Shopify Setup
This is the default setup for standard Shopify stores using Shopify's built-in checkout. If you use a COD (Cash on Delivery) plugin like Releasit or EasySell, see the dedicated sections below instead.
Installation Steps
-
Open Customer Events
Go to your Shopify Admin → Settings (bottom-left) → Customer Events -
Add a Custom Pixel
Click "Add custom pixel" → Name itServerTrack.io -
Paste Your Tracking Code
Copy the code from your ServerTrack dashboard (Setup Kit → Shopify) and paste it into the pixel editor. Replace all default content. -
Save & Connect
Click Save, then click Connect. The pixel will begin capturing events immediately.
Where to get your code: Log in to ServerTrack → Select your server → Setup Kit → Shopify. The code is pre-filled with your Authentication Key. Just copy and paste.
One pixel only: Install only ONE ServerTrack pixel per store. If you switch from Standard to Releasit/EasySell version, remove the old pixel first to avoid duplicate events.
 Shopify + Releasit COD Form & Upsells
If you use the Releasit COD Form & Upsells plugin for Cash on Delivery orders, you need a specialized pixel code that captures Releasit form submissions as Purchase events.
Why a separate code? Releasit bypasses Shopify's standard checkout flow. Standard Shopify events like checkout_completed don't fire for COD orders placed through Releasit. Our specialized code listens for Releasit's form submission events and correctly fires Purchase tracking.
Installation
- Go to Shopify Admin → Settings → Customer Events
- Click "Add custom pixel" → Name it
ServerTrack.io - Releasit - Copy the Releasit-specific code from your ServerTrack dashboard (Setup Kit → Shopify → Releasit COD Plugin)
- Paste into the pixel editor, replacing all default content
- Click Save, then Connect
Important: Remove any standard ServerTrack pixel if you're switching to this version. Only one ServerTrack pixel should be active at a time.
 Shopify + EasySell COD Form & Upsells
If you use the EasySell COD Form & Upsells plugin, use the dedicated pixel code that captures EasySell's order confirmations.
Same principle as Releasit: EasySell also uses its own form-based checkout that bypasses Shopify's native checkout events. Our EasySell-specific code correctly captures these orders as Purchase events for accurate ROAS tracking.
Installation
- Go to Shopify Admin → Settings → Customer Events
- Click "Add custom pixel" → Name it
ServerTrack.io - EasySell - Copy the EasySell-specific code from your ServerTrack dashboard (Setup Kit → Shopify → EasySell COD Plugin)
- Paste into the pixel editor, replacing all default content
- Click Save, then Connect
Important: Same rule applies - only one ServerTrack pixel per store. Remove any other version before activating this one.
Shopify Tracked Events
All Shopify pixel versions (Standard, Releasit, EasySell) automatically track these events:
page_viewed
Every page load
product_viewed
Product detail page
product_added_to_cart
Add to cart button clicked
cart_viewed
Cart page opened
search_submitted
Search query submitted
collection_viewed
Category/collection page
checkout_started
Checkout begins
checkout_completed
Order confirmed & paid
Custom events on Shopify: Need to track something not listed above? Contact our team - we'll add custom event support to your pixel code for free.
Shopify Video Guide
Watch the complete Shopify Custom Pixel installation walkthrough:
Video tutorial coming soon
Detailed Shopify pixel setup walkthrough in production
JavaScript SDK
The JavaScript SDK works with any website or framework - Laravel, React, Vue.js, Angular, Next.js, Nuxt, Express.js, static HTML, or anything else. Add one script tag, then fire events anywhere in your code.
Universal Installation
Add this snippet to the <head> section of every page on your website. This loads the ServerTrack SDK asynchronously (it won't slow down your page).
<!-- ServerTrack SDK -->
<script>
(function(w, d, u, k) {
    w.ServerTrack = w.ServerTrack || {};
    w.serverTrackQueue = [];
    w.st = function() { w.serverTrackQueue.push(arguments); };
    var s = d.createElement('script');
    s.async = 1;
    var randomPath = Math.random().toString(36).substring(2, 15);
    s.src = u + '/lib/' + randomPath + '?key=' + k;
    var h = d.getElementsByTagName('script')[0];
    h.parentNode.insertBefore(s, h);
})(window, document, 'https://data.yoursite.com', 'YOUR_AUTH_KEY');
</script>
Replace the values: Change https://data.yoursite.com to your custom domain and YOUR_AUTH_KEY to your Authentication Key from the ServerTrack dashboard. You'll find the ready-to-use code with your values pre-filled in Setup Kit → JavaScript SDK.
How it works: The SDK creates a global st() function. Before the SDK fully loads, calls to st() are queued and replayed once ready. This means you can fire events immediately without waiting for the script to load - no race conditions.
After Installation - Fire Events
Once the SDK is installed, you track events by calling the st() function anywhere on your page:
st('track', 'EventName', { /* event data */ }, userData);Each framework section below shows how to integrate this into your specific setup. After reviewing your framework, jump to the Event Reference for full parameter documentation.

Laravel
PHP framework with Blade templating
Add the SDK script to your main Blade layout file (typically resources/views/layouts/app.blade.php) inside the <head> tag. Then fire events in individual page views or components.

React
Built with React and Vite
Add the SDK script to your index.html (or use a useEffect hook). Fire events in components using the global window.st() function on route changes or user interactions.

Vue.js
Built with Vue.js 3 and Vite
Add the SDK to your index.html or load it in your Vue app's entry point. Call window.st() in component lifecycle hooks, Pinia actions, or route guards for SPA tracking.

Angular
Built with Angular 17+
Add the SDK script to your src/index.html. Create a tracking service that wraps window.st() and inject it into your components. Use Angular's Router events for page-level tracking.

Express.js / Node.js
Server-rendered or SSR applications
For Express.js or any Node.js app serving HTML, include the SDK script in your template engine (EJS, Pug, Handlebars). For SPAs served by Express, add it to your static index.html.
Firing Events (All Frameworks)
Regardless of which framework you use, firing events is always the same. The st() function accepts four arguments:
st('track', 'EventName', eventData, userData);| Argument | Type | Description |
|---|---|---|
| 'track' | string | Always 'track' - tells the SDK to send an event |
| 'EventName' | string | Standard event name (ViewContent, Purchase, etc.) or any custom name |
| eventData | object | Product details, value, currency, content IDs, etc. |
| userData | object | Customer info for enhanced matching (email, phone, name) |
User Data & Match Quality: The more user data you provide, the better your match rates on Facebook, TikTok, and Google. At minimum, include em (email). For purchases, include as much as possible: em, ph, fn, ln, ct, country. ServerTrack hashes this data before sending to platforms.
See the Event Reference below for complete examples of each event with all available parameters.
ViewContent
Fire this event when a user views a specific product or content page. This helps platforms understand user intent and build retargeting audiences.
When to fire: Product detail pages, article pages, landing pages - any content you want to track views for.
// User data - provide as much as available
var userData = {
    em: "[email protected]",  // Email (most important for matching)
    ph: "+8801701301233",        // Phone with country code
    fn: "Alif",                  // First name
    ln: "Mahmud",                // Last name
    ct: "Dhaka",                 // City
    country: "bd"                // Country (ISO 2-letter code)
};

// Fire ViewContent on page load
document.addEventListener('DOMContentLoaded', () => {
    st('track', 'ViewContent',
        {
            content_ids: ['SKU-622'],        // Product ID or SKU
            content_type: 'product',         // 'product' or 'article'
            content_name: 'Spain Wallet',    // Product/page name
            content_category: 'Wallet',      // Category
            value: 390,                      // Current price
            currency: 'BDT',                 // ISO currency code
            price: 650,                      // Original price (optional)
            discount: 260,                   // Discount amount (optional)
            content_list: 'Related Products' // List/context (optional)
        },
        userData
    );
});
AddToCart
Fire this event when a user adds an item to their shopping cart. This is critical for building cart-abandonment retargeting audiences.
When to fire: On the "Add to Cart" button click handler. Don't wait for page reload - fire immediately on the click event.
function addToCart(product) {
    var userData = {
        em: "[email protected]",
    };

    st('track', 'AddToCart',
        {
            content_ids: [product.id],       // Product ID
            content_type: 'product',
            content_name: product.name,      // Product name
            value: product.price,            // Price added at
            currency: 'BDT',
            content_list: 'Shopping Cart',
            num_items: 1,                    // Quantity added
            price: product.price,            // Unit price
            discount: 0                      // Discount (if any)
        },
        userData
    );
}

// Example: Attach to button click
document.querySelector('.add-to-cart-btn').addEventListener('click', () => {
    addToCart({ id: '622', name: 'Spain Wallet', price: 390 });
});
InitiateCheckout
Fire this event when a user starts the checkout process. This identifies high-intent users who are close to purchasing.
When to fire: When the checkout page loads, or when user clicks a "Proceed to Checkout" button. Include all cart items in the contents array.
var userData = {
    em: "[email protected]",
    ph: "+8801701301233",
};

document.addEventListener('DOMContentLoaded', () => {
    st('track', 'InitiateCheckout',
        {
            value: 780,                      // Total cart value
            currency: 'BDT',
            content_type: 'product',
            num_items: 2,                    // Total items in cart
            content_ids: ['622', '95'],      // All product IDs
            contents: [                      // Detailed items array
                { id: '622', quantity: 1, item_price: 390 },
                { id: '95', quantity: 1, item_price: 390 }
            ]
        },
        userData
    );
});
Purchase
Fire this event upon successful payment confirmation. This is the most important event for ROAS tracking and platform optimization. Provide as much user data as possible here.
Critical: Always include transaction_id or order_id to prevent duplicate event counting. Platforms use this to deduplicate server-side and browser-side events.
// For Purchase events, provide maximum user data
var userData = {
    em: "[email protected]",    // Email
    ph: "+8801701301233",          // Phone with country code
    fn: "Alif",                    // First name
    ln: "Mahmud",                  // Last name
    ct: "Dhaka",                   // City
    country: "bd"                  // ISO country code
};

document.addEventListener('DOMContentLoaded', () => {
    st('track', 'Purchase', {
            currency: "BDT",
            value: 1260,                     // Total order value
            transaction_id: "TXN_12345",     // Unique transaction ID
            order_id: "ORD_12345",           // Your internal order ID
            shipping: 60,                    // Shipping cost
            content_type: 'product',
            content_ids: ["95", "622"],       // All purchased product IDs
            contents: [                      // Detailed items
                { id: "95", quantity: 2, item_price: 600 },
                { id: "622", quantity: 1, item_price: 60 }
            ],
        },
        userData
    );
});
Revenue tracking: The value field should be the total amount the customer paid (including shipping, after discounts). This is what platforms use for ROAS calculation. Make sure the currency matches your actual transaction currency.
Custom Events
ServerTrack supports any custom event name. Use the second argument to define your own event names for tracking specific user actions not covered by standard events.
// Basic custom event
st('track', 'NewsletterSignup', { source: 'footer_form' }, userData);

// Lead form submission
st('track', 'Lead', {
    form_name: 'Contact Form',
    lead_type: 'sales_inquiry'
}, userData);

// Any name you want
st('track', 'WishlistAdd', { content_ids: ['SKU-99'] }, userData);
Example: Shop Page (Product Loop)
If you want to track which products are visible on a category or shop page, build the data dynamically from your product loop:
var userData = {
    em: "[email protected]",
    country: "bd",
};

document.addEventListener('DOMContentLoaded', () => {
    var productContents = [];
    var contentIds = [];

    // Loop through visible products on the page
    // (In practice, use your template engine or framework to generate this)

    // Product 1
    productContents.push({ id: "30", item_price: 5000, quantity: 1 });
    contentIds.push("30");

    // Product 2
    productContents.push({ id: "31", item_price: 499, quantity: 1 });
    contentIds.push("31");

    // Product 3
    productContents.push({ id: "32", item_price: 1200, quantity: 1 });
    contentIds.push("32");

    st('track', 'ShopPage',
        {
            content_name: "Shop Page",
            content_category: "All Products",
            content_type: "product",
            value: 0,
            currency: "BDT",
            contents: productContents,
            content_ids: contentIds
        },
        userData
    );
});
Naming convention: Use PascalCase for event names (e.g., ShopPage, LeadForm, WishlistAdd). These names will appear in your platform dashboards and ServerTrack event logs exactly as you define them.
Step-by-Step Video Tutorials
Visual learner? Watch our video guides covering the complete setup process from start to finish.
Complete Setup Overview
Topic-Specific Guides
Connect Facebook CAPI
Video coming soon
Connect TikTok Events API
Video coming soon
Connect Google Analytics 4
Video coming soon
Custom Domain Setup
Video coming soon
WordPress Plugin Setup
Video coming soon
Shopify Custom Pixel Setup
Video coming soon
Install JavaScript SDK
Video coming soon
Setup Complete - What's Next?
Video coming soon
Debugger & Logs
ServerTrack provides two powerful tools to verify your integration is working correctly and diagnose any issues.
Live Event Debugger
The Live Debugger shows events in real-time as they arrive at ServerTrack. Use it during setup to instantly confirm your tracking code is firing correctly.
- Open your ServerTrack dashboard → Select your server
- Go to the Debugger tab
- Open your website in another tab and trigger an event (load a product page, add to cart, etc.)
- You should see the event appear in the debugger within 1-2 seconds
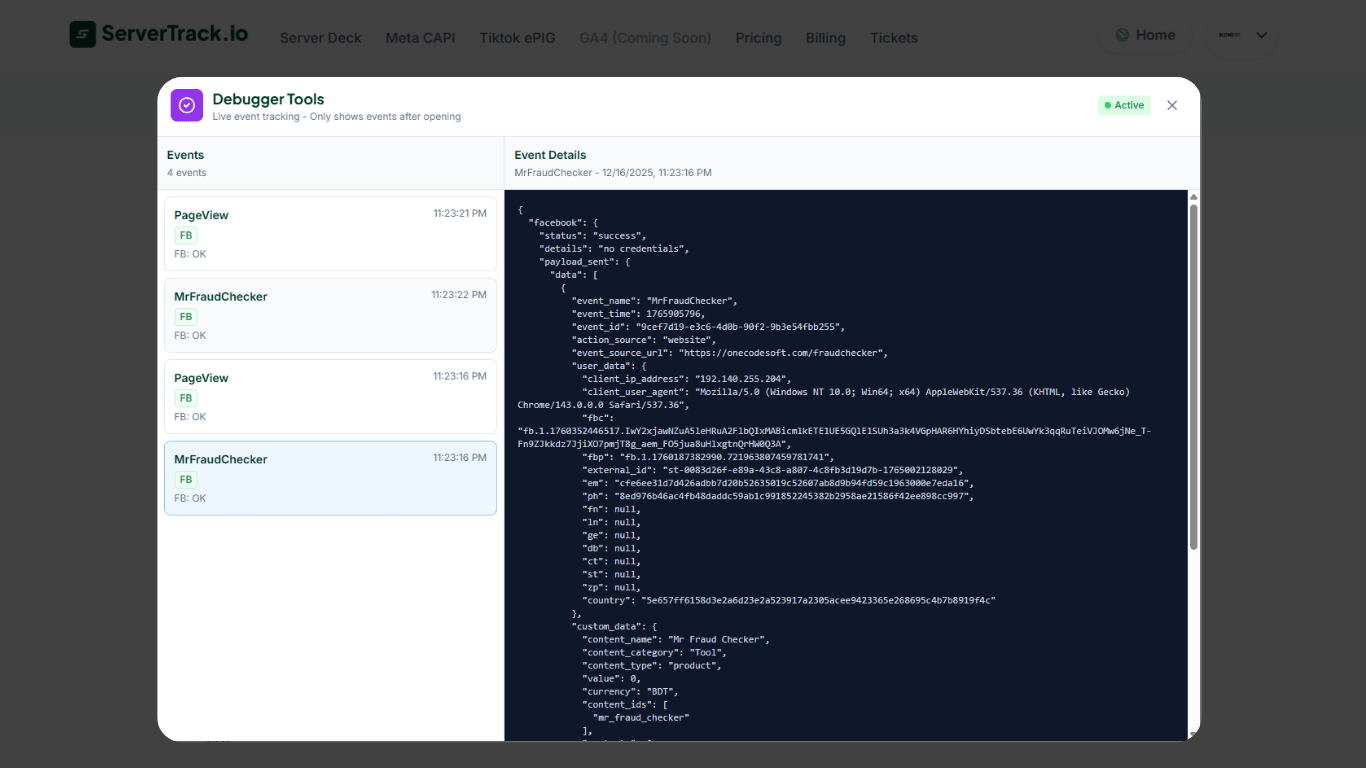
Pro tip: Keep the debugger open while installing your pixel. As soon as you save and refresh your site, events should start appearing. If they don't, double-check your Authentication Key and custom domain configuration.
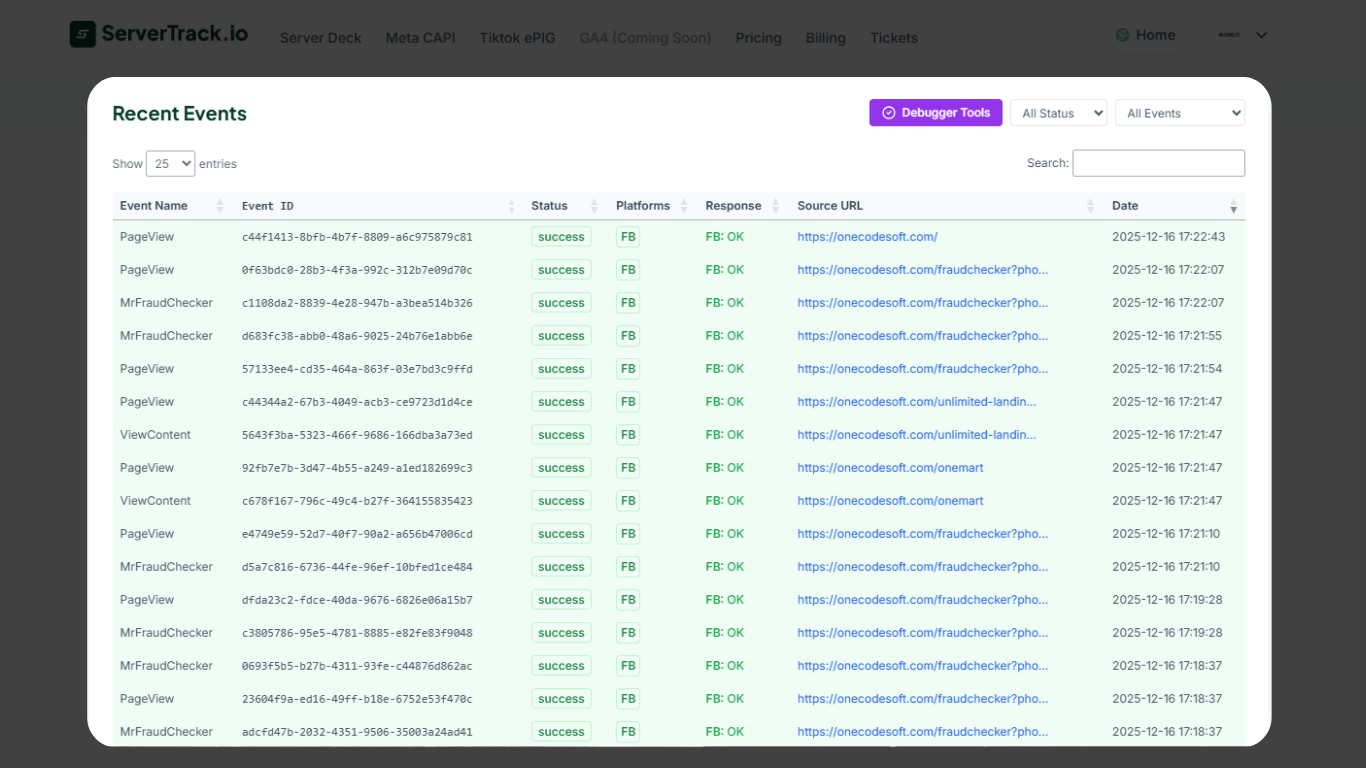
Event Logs (Historical Data)
The Event Logs table shows all events received over time. Use it to audit data, check for duplicates, or investigate discrepancies between ServerTrack and your platform dashboards.
Common Issues & Troubleshooting
Events not appearing in debugger
- Verify your Authentication Key matches the one in your dashboard
- Check that your custom domain CNAME is correctly propagated
- Ensure the SDK script is in the
<head>and loads before event calls - Check browser console for any JavaScript errors
Events appearing in ServerTrack but not on Facebook/TikTok
- Verify your Pixel ID and Access Token are correct in Server-Side Connection Settings
- Check if the platform is rejecting events (look for error indicators in the logs)
- Allow up to 20 minutes for events to appear in Facebook/TikTok dashboards
Duplicate events
- Make sure you only have ONE ServerTrack pixel installed per site
- For Shopify: check that you don't have both Standard and Releasit/EasySell pixels active
- For Purchase events: always include
transaction_idfor deduplication
Support
If you encounter issues during setup or have questions, our team is here to help.
Ticket Support
For technical issues, create a support ticket from your dashboard. Include screenshots and a description of the problem.
- Log in to your Dashboard
- Go to the Support tab
- Click Create Ticket
- Describe your issue and attach screenshots
Hire an Assistant
Don't want to set it up yourself? Our team can handle the entire integration for you. We'll install the tracking code, verify events, and ensure everything works perfectly.
Create a "Paid Assistant" ticket from your dashboard to get started.